|
How to install Nordic Backup Pro on Windows
|
|
|
|
Print User Guide
|
|
01 - Login
|
|
|
|
To the right on the menu bar on the Nordic Backup website you will find "Login". Click here to open the login page.
|

|
|
|
Log in to your Nordic Backup account with your user name and password. Click OK.
|

|
|
|
02 - Downloading Nordic Backup Pro
|
|
|
|
Click on "Install Nordic Backup” to open the download page where you can download Nordic Backup Pro on operating systems.
|
|
|
If you use an operating system other than Windows, select your operating system in this list at the top of the page.
You can choose from:
- Microsoft Windows
- Apple Macintosh
- Linux
- Netware
Click on the link for the version that matches your operating system.
The installation package works for 32 and 64 bit operating systems, however there is a separate download for older operating systems.
|

|
|
|
Click "Run" to download and begin installation of Nordic Backup Pro.
|

|
|
Nordic Backup Pro download and installation will start automatically.
If the installation does not start automatically, open the installation file from the location to which you’re downloading. Click "Open" to continue.
|

|
|
|
If you are prompted for any installation warnings, Click "Run", “Yes”, “Agree” or “I know where this software came from”.
|

|
|
|
03 - Installing Nordic Backup Pro
|
|
|
|
Click continue to start the installation process.
|

|
|
We recommend you quit all other applications before continuing installation.
Click "Next".
|

|
|
Read and accept the user’s agreement to continue the installation.
Press the "I accept this agreement" and then "Next" to continue.
|

|
|
Choose where you want Nordic Backup Pro to be installed. The default location is recommended.
Press "Next” to continue.
|

|
|
Choose whether to install Nordic Backup Pro for all users of the computer or just for the current user. This customizes whether all users see the Nordic Backup Pro program running down by the clock or in the Start Menu.
We recommend you choose "Anyone...".
On terminal servers, select "Me only", so other users do not get the shortcuts placed on the desktop.
Press "Next" to continue.
|

|
|
Nordic Backup Pro is now ready to be installed.
Press "Install" to begin installation.
|

|
|
Nordic Backup Pro is now installed.
Click "Finish" to exit.
|

|
|
|
04 - Configuring Nordic Backup Pro
|
|
|
Nordic Backup will launch automatically and prompt you for the initial connection information. Complete the backup server address with the address you received by e-mail. Pay attention to any spaces if you copy-and-paste the address. The link should be HTTPS.
If you need the address of the backup server, you can also find this by logging into your account on our website. The address will appear at the bottom of the first page.
Click "Next" to begin the connection to Nordic Backup.
|

|
|
Enter login (username) and password included in your account email.
Note that in the Nordic Backup Pro your username must be written in upper case letters. You may also choose the check box so that you can save your password.
Click "OK" to continue to connect to Nordic Backup's secure server.
|

|
|
A new window called "New Backup Set Wizard” opens automatically. We recommend that you set a descriptive name such as "Backup of My Files" or "Server01 - File".
You may change the type of backup in the drop down box if you would like to setup a backup of data other than a file backup (database, systemstate, ShadowProtect). The default is type is a file backup.
Then click "Next".
|

|
|
Here you select the files and folders you want to back up.
Click on the "Advanced" button to use the explorer interface to select the files and folders to be backed up.
By default, Nordic Backup Pro suggests the following folders:
- My Documents
- Outlook / Outlook Express
- Favorites
- Desktop
The gray box next to "Local Disk (C:)” says that there are selected folders / files on the drive (C:). Use the + sign next to the drive/folders to expand to see more.
Then click "Next".
|

|
|
In the Advanced Backup Source, you may add additional drives/folders/files to the backup set. The check box next to "Local Disk (C:)” indicates that the entire volume is selected for backup, a grey box indicates that there are selected folders/files on the drive, but not everything. Use the + sign next to the drive/folders to expand to see more.
Click "OK" when done selecting files, then click "Next".
|

|
|
Choose how often the Nordic Backup Pro should automatically start the backup by selecting the 'Properties' button in the bottom right.
The default setting sets the backup at 9pm (21:00 hours) every day.
The computer must be turned on and connected to the Internet. It should not go into standby or sleep/hibernation while the backup is running.
If your computer is not turned on or connected to the Internet at the scheduled time, you will receive a "Scheduled Backup Error" reminder e-mail from Nordic Backup.
By clicking "Add" you can create multiple schedules for backup, for example, if it is to start/stop different on weekdays compared to weekends.
|

|
|
To change the schedule, you have four options:
- Daily, if you want to backup 7 days a week.
- Weekly, if you want to backup on selected days.
- Monthly, if you want to backup on certain days of the month.
- Custom, if you want to take one backup at a specific time.
Under "Start", select the time of day when the backup starts.
In the "Stop" section, you can enter whether the backup should stop after a certain number of hours. Should the backup, for instance, start at 9pm (21:00 hours) and set to stop after 12 hours backing up as much data as possible, it will stop at 9am (09:00 hours).
Click "OK" in the scheduling box, then "Next" when you are finished customizing the schedules.
|

|
|
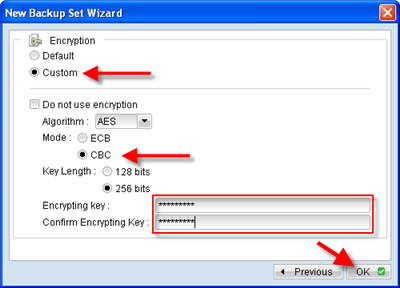
On this screen you set the encryption for this backup set. You can choose between “Default” and “Custom”
If you choose "Default” your files will be encrypted with the password you use to log into the Nordic Backup Pro.
Note that the encryption key then is fixed and does not change if you subsequently change the password.
We recommend that you select "Custom" and enter an encryption key of your choice for maximum security.
Click "OK" to complete the backup set if "Default" is your selection.
|

|
|
It is important that you choose an encryption key which only you know, thus assuring that you are the only who can access your files through Nordic Backup.
Please note that your files cannot be restored without the encryption key. It is important that you keep it in a safe location, in case you lose your computer.
We recommend that you select the following options for encryption:
- AES algorithm
- CBC mode
- 256 bits
- Your encryption key must be at least 8 characters including upper case letters and lower case letters and at least one number.
Click "OK" to complete the backup set.
|
|
|
|
05 - Customization of Nordic Backup Pro
|
|
|
By clicking the "Backup Settings" button on the main screen, you can see and change settings for each backup set.
Please note that our software can be used by multiple computers, however it should only be used by one at a time. When you are finished configuring the software on one machine, save your settings and close the client before configuring another.
|

|
|
In the "Backup Setting" screen you can adjust any of your backup sets. To select which set to change, click on the drop down arrow button on the main screen, you can see and change settings for each backup set.
If you have backup sets that belong to another machine you are backing up, do not adjust settings except from the client software directly on that machine.
|

|
|
Backup Source
Click on the "Advanced" button to check for the files and folders selected for backup.
You can always change your choice and add or remove files and folders from the backup.
Note that if you deselect files or folders which have already been backed up, then at the next backup they will be recorded as deleted and Nordic Backup Pro transfers the files to the archive. They are then under the Retention Policy rules and will be deleted permanently after the specified number of days. This will allow the storage space to be released when the file are discarded according to Retention Policies.
|

|
|
In the Advanced Backup Source, you may add additional drives/folders/files to the backup set. The check box next to "Local Disk (C:)” indicates that the entire volume is selected for backup, a grey box indicates that there are selected folders/files on the drive, but not everything. Use the + sign next to the drive/folders to expand to see more.
Click "OK" when done selecting files.
|
|
|
Backup Schedule
Here you can see the timetable for the scheduler to start the backup.
By default Nordic Backup Pro begins backup every day at 9pm (21:00 hours).
The computer must be turned on and connected to the Internet. It should not go into standby or sleep/hibernation while the backup is running.
If your computer is not turned on or connected to the Internet at the scheduled time, you will receive a "Scheduled Backup Error" message e-mail from Nordic Backup.
|

|
|
In the Backup Schedule properties screen, you may customize the backup schedule. To change the schedule, you have four options:
- Daily, if you want to backup 7 days a week.
- Weekly, if you want to backup on selected days.
- Monthly, if you want to backup on certain days of the month.
- Custom, if you want to take one backup at a specific time.
Under "Start", select the time of day when the backup starts.
In the "Stop" section, you can enter whether the backup should stop after a certain number of hours. Should the backup, for instance, start at 9pm (21:00 hours) and set to stop after 12 hours backing up as much data as possible, it will stop at 9am (09:00 hours).
Click "OK".
|
|
|
Encryption
Here you can see the encryption key that is used for backup and restores. Check the box to see what the current key is set to. The backup set will have to be re-created if you want to change the algorithm or mode used.
You may change view the key on this screen, however all previous backup sets will need to use the previous encryption key.
Note that your files cannot be restored without the encryption key, therefore it is important that you save this in a safe place where you can find it, in case you lose your computer.
|

|
|
Continous Data Protection
The CDP option is used to run a backup set more often than once a day. It is important to disable the Backup Schedule when using this option because it will run the specified update interval 24 hours a day. This option can only be used for FILE Backups.
Check the box to enable the CDP option. The "Time Mark Interval" defines the interval of point-in-time views generated by CDP. For example, if this setting is set to “60 minutes”, the point-in-time views selectable under Nordic Backup restore wizard and File Explorer will be “00:00”, “01:00”, “02:00” etc, for each day.
The "Minimum Update Interval" defines the minimum interval that repeatedly updated files are backed up again. For example, if a file is updated every minute and the [Minimum Update Interval] is set to “10 minutes”, CDP backs up this file every 10 minutes instead of every minute. Using the CDP option still applies the In-File Delta incremental backups for changed files. By default, Nordic Backup will run 100 delta backups of a file, then another full backup. See below for more information.
|

|
|
In-File Delta
Delta Block mode is very suitable for backup of large files, as it only takes backup of the changes in the file itself. Even if a file is 1 GB, it can easily change as little as 50 MB. After the initial full backup, changes are then the only part of the large file that is backed up.
We recommend that you use the default settings.
"Incremental"
A small block for each change since the complete backup.
Advantage: Fast backup and minimum consumption of storage space.
Disadvantage: Slower recovery, since many small Delta blocks must be downloaded since the last full was taken.
"Differential"
A growing block with all changes since the complete backup
Advantage: Quick Restore because few larger files must be downloaded
Disadvantage: Takes up more storage and backup becomes progressively slower due to the growing Delta Block.
|

|
|
Advanced In-File Delta setting allows users to override default in-file delta type when on a certain number of days (e.g. all Sundays or the 1st day of each month). This is useful if you want all in-file delta backups to be incremental but you want to do a differential in-file delta backup on Saturdays as well as the full file backups on the 1st day of every month.
If you want to do this, simply press the [Advanced] button and the [Advanced In-File Delta Type Setting] dialog will be popped up as shown below.
|

|
|
Retention policy
Use this feature to configure how long the changed and deleted files are to be stored in the archive.
Only changed files are affected by the retention policy, current (unchanged) files will reside on the backup forever.
We recommend that you make use of the many benefits of Nordic Backup Pro offers as an online backup system. Nordic Backup Pro can retain all changes up to one year of backups (365 days), but be advised that all data is counted toward your backup quota. If you would like to increase or decrease your data storage limit, it can also be managed through the Nordic Backup website at any time.
We recommend you set Retention time to 30 days minimum.
|

|
|
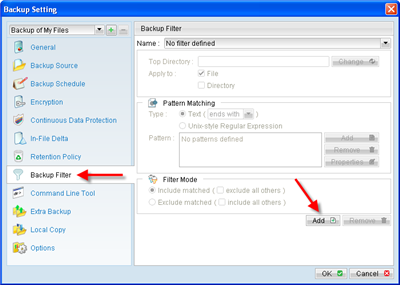
Backup Filter
Here you can create filters either select or deselect files or folders for backup.
You can, for example, create a filter that includes all .MP3 or .MOV files on the volume/directory selected for backup.
After you create filters, you can check and see the effect of these under the "Backup Source" where those files will be selected or deselected.
|
|
|
Command line tool
Here you can set up "Pre-backup" and "Post-backup" batch commands the computer must run.
For example, you can setup a batch command to close another program or stop a service before the backup starts and then resume the original program after the backup is finished.
Tip:
For unsupported databases (also known as flat file databases), you can create a "Pre-backup" script which stops the database, copies it to a temporary directory and starts the database again.
Include the temporary folder in the backup selection and Nordic Backup Pro will then upload the database files to the backup and the database has only been offline for a short amount of time.
You can also create an "Post-backup" script that deletes the temporary folder after the backup is finished.
|

|
|
Extra Backup
Off-line backup is basically designed for notebook users who are off-line most of the time and cannot rely on the backup schedule to backup regularly. The "Backup Interval" allows notebook users to specify the interval that they would like their data to backup. When the machine is online and this interval has elapsed, backup will run automatically.
If "Show Backup Reminder" is enabled, a popup message box will ask the user to confirm starting the backup.
The "Email Notification" setting is the number of days since the last backup that triggers the backup server to send email notification to the client to remind him to run an off-line backup. When the "System Logout Backup Reminder" setting is enabled, a popup message box will ask the user to start a backup before logging out / shutting down Windows.
|

|
|
Local Copy
This option enables you to opt in to a local backup of selected files without modifying archives.
We do not recommend using the local copy, because only the changes from the last backup are saved. The function can be used to store an extra copy, an external hard drive, for example, which is then replaced periodically. This is similar to the old tape / hard disk backups.
|

|
|
Options
Here you can select the folder for temporary files. We recommend that you select the drive which has the most free disk space.
The "Enable Volume Shadow Copy" allows you to backup files that are exclusively opened. Without Volume Shadow Copy, you will get the error message “The process cannot access the file because another process has locked a portion of the file” if you are trying to backup a file that is exclusively opened (e.g. Outlook PST file). In most cases, there is no reason to disable this option.
|

|
|
|
US v1.0
|
|
|